Friday, April 27, 2012

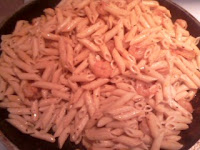
Shrimp Pasta

My family tolerates Shrimp.  I love it. 
This is a super simple recipe that you can do really with any meat.
  I have done similar things with smoked sausage, chicken,
anything you want to use is fine. 
The first thing I did was start 1 lb of pasta boiling in my big pot.
Then pick a Grill Mates Marinade that lookes good to you.
Of course you can mix your own marinade or choose another brand, this is just what we like.  I mixed it according to package directions using 1/4 C. Water, 1/4 C. Olive Oil, and 2 T. Vinegar.  I whisked in the marinade.
  All this was done right in the skillet.
Next I added  a 12 oz. Bag of Shrimp. The shrimp was frozen right out of the freezer but I bought them pre cooked
so all you really have to do is heat and eat.
Bring this up to a good simmer and
let the shrimp cook  while the pasta is cooking. 
The Shrimp and marinade will reduce down like this -
Drain your pasta, dump it on top of the shrimp and toss.
 There you have it - a super simple, super speedy dinner!
I served it with a tossed salad.  The whole dinner was probably less than $10.00. The Bag of Shrimp was $5.00 add a box of pasta for about $1.50, the marinade mix for less than $1.00 and a bag of salad for $1.50 and there you have it!  With the cost of beef these days I am finding other meats to be used more often in my home since they are more comparable in price to ground beef than they used to be.
What's your super speedy, super simple go to meal? 


Wednesday, April 25, 2012

Hard Boiled Eggs

It is amazing to me how much trouble people have boiling an egg.  It is equally amazing to me how many different ways there are to boil an egg.  Do you leave the water boiling the whole time? Bring it to a boil and turn it off? Soft Boil? Hard Boil? I recently heard you can even "boil" your egg by baking it in the oven.  I guess I have really never paid so much attention to this issue since I personally feel it is pretty simple.  I really have very little problems boiling an egg.  I never soft boil - what is the point? If I want a soft boiled egg why not just poach an egg?  Also along those lines I am the only person in my family who likes a runny yolk, so for my crew here it is hard boiled all the way.   I will talk you through my steps of how to boil an egg.

Put the desired amount of eggs into a large pan.  Cover generously with water.  Sprinkle about 1T. Salt in the water.  The salt will help if the egg happens to crack while cooking.  It will keep the whites tight to the egg and not stringing all over the pot.
Turn the stove on high and bring to a boil.  Once the pot comes to a boil set your timer for 10 minutes. Leave the heat on high and let those eggs vigorously boil for 10 minutes.  Once the timer goes off immediately remove from heat and pour off the hot water. 
Fill the pot with cold water.
This shocks the eggs and stops the cooking.  I rinse and re-fill the pot 3-4 times with cold water. Next I peel the eggs. When I was growing up my mom would take a pencil and write a "B" on the shell of all the boiled eggs.  They would go in the fridge and wait to be peeled until we wanted to eat them.  I have found by doing this I most certainly will loose half of my whites in the peeling process.  When you peel your warm eggs I have found that it is more likely to have a clean removal of the shell from the egg with little to no loss of whites in the peeling process. 
First crack the egg completely all over the surface of the egg.  I just do this on my sink.  Then with a light stream of warm water I peel the egg, allowing the water to "push" between the egg and the shell as I pull the shell off.  Make sure you have pulled the inside membrane off with the shell, it will help with the peeling process.  Give the eggs a final rinse and store in an air tight container.
These peeled eggs are ready to eat.  My family will snack on them, have them for breakfast, or make an egg salad sandwich or deviled egg.  If they are just eating the egg they sprinkle on a little salt.  My husband likes them best warm right after I have peeled them.  If I am making an egg salad or deviled egg I add a little pickle relish, garlic, salt, pepper, mustard, mayo or miracle whip (or both) and for deviled eggs some paprika on top.  You will notice from the cut egg that this cooking process will leave the egg beautifully yellow and white with
no ugly grey ring around the yolk.
It works every time!  How do you enjoy your eggs?

Thursday, April 19, 2012

Ham Hock Soup

This is one of those recipes that brings back memories for me.  I don't know where my mom got the recipe but she used to make it and the smell filled the house.  I guess I was longing for those familiar smells, and memories of growing up with my mom making the soup.  I found myself wanting my own kids to have those kind of memories and maybe repeating the process when they become mothers.  That's a lot to expect from some dried pinto beans and a ham hock. This soup takes some time.  I suppose you could speed up the process by using canned beans....but that's not how I remember this soup.
 I made mine the way my mom made hers. 

Start with 1 lb of dried Pinto Beans. 
Rinse the beans and cover them with
several inches of water in a large stock pot overnight.
The beans will soak up quite a bit of water so be sure you have plenty of water in the pot. In the morning drain and rinse the beans. Cover the beans with water and be sure to pick out any floating beans or skins.  Then put the ham hocks in the pot.  I used 2 of them.  Make sure you have enough water in the pot to cover the ham hocks.
I then added about 1/4 C. Dehydrated Onion
 and about 3 T. Minced Garlic.
Put a lid on the pot, bring the beans to a boil, and then reduce heat and simmer for about 2 hours. Stir occasionally.  At the end of the 2 hours the beans should be soft.  If they are not soft then just simmer a little longer until they become soft.  Remove the ham hocks from the pot and separate off the meat from the fat and bone.
Put the meat back into the pot with the beans.
Chop 4 carrots and 6 potatoes and add to the pot. At this point I also added about 5-6 shakes of Tabasco and a little black pepper.  No salt was needed because the ham added enough on its own.
At this point I debated adding a can of green chilies.  I did not do it since I wanted to stay true to my mom's recipe - but I think I will do the green chilies the next time I make this.
Put the lid back on and simmer until vegetables are cooked.
Once done you can use a slurry of cornstarch and cold water to tighten up that broth into the consistency you want for your soup.  Some people like it thick and some like a lot of broth.
Looks good...right?

Saturday, April 14, 2012

Chocolate Browine Trifle

I have two trifle bowls.  I have used a trifle bowl about 4 or 5 times in 18 years. Every time I use it I wonder why I don't use it more often.  They are so fun and easy to make.  The variety is endless on the types of trifle there is and for that matter the things you could layer in a trifle bowl - like a 7 layer salad for example.  This past week my husband and I decided to decline the job transfer so I have been busy unpacking and grateful for the clean out of the garage and basement.  Because we were moving a friend invited us over for lunch before we left town.  As excited as I was to have lunch with them I did come clean that we decided to stay here - fortunately they still wanted us to come to lunch and I offered to bring dessert.  I had my daughter ask their teenage son what he liked for dessert and his response was Chocolate, Chocolate anything Chocolate.  So I put together a Chocolate Brownie Trifle.

For the most part this is what you will need:
1 Box of your favorite Brownie Mix
1/4 C. water, 1/2 C. oil and 3 Eggs for the Brownie Mix
2 (3.2 oz) boxes Instant Mousse
2 C. Milk for the Mousse
8 oz. Cream Cheese
1 C. Powdered Sugar
1 (8 oz) Container Cool Whip
Mini Chocolate Chips

First I made the Mousse since it takes a couple of hours to set up.
Just mix according to package directions.
Then I made the Brownie Mix.  I usually like the fudge version that uses less eggs, but for this Trifle I chose to make the cake like brownies that used an extra egg.  I baked the brownie mix in 2 round pans.  These fit perfectly in my Trifle Bowl and I don't need to break apart the brownies into clumps.  I also do this if I am making a Trifle using cake.  It is so much easier to put the whole round in at one time. Just bake according to package directions.
Next I mixed together the softened cream cheese, powdered sugar,
and cool whip and placed it in the fridge.
Once the brownies were cooked and completely cooled I was able to begin assembly. First I put one of the brownie rounds in the bowl
Next I alternated the white cream cheese mixture
and the chocolate mousse
I repeated these layers and topped with mini chocolate chips
These are so easy to make - You can get creative...White Chocolate Raspberry Cheesecake, Strawberry Shortcake, Pumpkin Cream Cheese...let your imagination run wild.

Let me know what you think!


Friday, April 6, 2012

White Chicken Chili

Let me outline my day for you today.  I did not sleep well last night and needed to get up early for a work meeting....which went very well by the way.  After the meeting I did some grocery shopping and decided I wanted to make White Chicken Chili for dinner.  I came home, sat out some lunch meat, sandwich buns, lettuce, tomato, cheese, chips, etc. and told everyone to make their own deli sandwich while I started to put dinner into the crock pot.  I have made this recipe many times, but never in the crock pot.  I decided to cook it this way because today is the day the girls and I are going to clean out the garage, and I knew I would not be in the mood to make dinner once that was done.  It worked well in the crock pot and I will probably do it again.  There are many ways people make White Chicken Chili, just like traditional chili, everyone has their own way they like it...and this is mine!

White Chicken Chili

1 pkg. Chicken Breast Tenderloins
2 cans (14.5 oz) Chicken Broth
2 cans (15 oz) Great Northern Beans
2 cans (15 oz) Navy Beans
2 cans (15 oz) White Kidney Beans
2 cans (15 oz) Sweet Corn .. OR .. White Corn
1 (7 oz) can Chopped Green Chilies
salt and pepper
cornstarch

Clean and dice the Chicken Breast Tenderloins
Drain the juices out of the beans and corn.
They don't have to be completely drained, just mostly drained.
Dump all the diced chicken, beans, corn, green chilies and chicken broth into the crock pot and give it a stir.
Turn the crock pot on high for about 4 or 4 1/2 hours.
Salt and pepper to taste.
Make a slurry of cornstarch and water to thicken up the Chili. 
 Stir it in and cook for another 15 minutes, then ENJOY!

This could not have been any easier on a busy day.  It tastes delicious.  This is the first time I have used sweet yellow corn.  I will admit that I prefer the white corn in this recipe and will not be using the sweet yellow corn in the future.  If you don't want to use a crock pot then you can lightly cook the chicken in the bottom of a large stock pot with a little olive oil, and then add everything and cook it in the pot.  You can also add garlic, onion, or whatever else you want. 

Let me know what you think!


Tuesday, April 3, 2012

Garlic Bread Sitcks

For dinner tonight I am making Lasagna and using my French Bread recipe to make some Garlic Bread Sticks.  It could not be any easier....I just added 3T. minced Garlic and 1 T. Parsley flakes to my dough.
I let it rise and shaped them into about 25 bread sticks
I spritzed the bread sticks with water and sprinkled on Parmesan Cheese
And let them rise.  I baked them at 375* and here is where I say...oops...sorry I forgot to time them but when they came out
they looked like this -
So as a side note....The garlic may seem a little strong to you - you could back it down to 2T. if you want.  Also I did not brush the tops with butter when they came out of the oven.  I wanted the bread sticks to be crusty and not soft.  Add a salad and there you have it...
dinner at the Wilson's tonight!

Let me know what you think!