Friday, June 22, 2012

Cinnamon Knots

This is a version of a cinnamon roll.  They are delicious and I have fun making them.  These are also pretty fast to make - I don't really go through the rising process that I do for a cinnamon roll.  I like a really big cinnamon roll so I usually let those rise overnight and bake them in the morning.  These are just quick little knots to make and are soooo delicious.  The recipe comes from my trusty Better Homes and Gardens Cook Book.  It is a basic sweet dough recipe
 that I turn into these little gems.

Sweet Rolls

1 C. Warm Milk
1 T. Yeast
1/3 C. Sugar
1/3 C. Margarine - softened
2 Eggs
1/2 tsp. Salt
4-5 C. Flour

Combine milk, yeast, and sugar. Add margarine, eggs, flour and salt.  Stir with a fork to combine.  Knead in enough flour so the dough is not sticky.  Split dough in half and repeat the following process with both halves of the dough.  Roll dough out to a large rectangle and spread butter, brown sugar and cinnamon over the top -
 no measurements - just spread it even.
Fold the dough into thirds and use a pizza cutter to
cut strips in the dough.
Now you get to tie your knot.  First twist one strip of the dough.
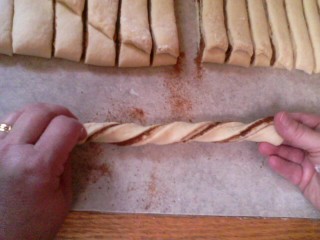
Next tie that twist into a knot.
And now tuck your ends in - one over and one under.
Place on a Greased Cookie Sheet. 
 I let them rest for 15 minutes before baking.
Bake at 375* for 15-20 minutes.  While the cinnamon knot is baking you can make your powdered sugar glaze.  I don't measure this, I just make it the consistency that looks like a good thick glaze. Combine Powdered Sugar, about 1 T. Vanilla and enough milk to make a glaze.  Add the milk slowly - it really does not take a lot to make your glaze.
  It should look like this.
Once the cinnamon knots are done baking put them on a cooling rack and immediately drizzle the glaze over the hot cinnamon knot.
This recipe should make at least 2 dozen knots - it just depends how thick you slice your dough. These are great for a crowd!


Thursday, June 21, 2012

Scones

Ok - let's face it....I bake less in the summer time.  That is totally normal.  No one wants to bake in the summer heat.  But...my family loves baked goods and I crave them also from time to time.  So I cheat.  Not everything has to be made from scratch.  I have found some delicious Barista Scones at my local Wal-Mart. 
They come in Chocolate Chip, Blueberry and Almond.  I have not been able to buy the Almond locally but the Chocolate Chip and Blueberry are delicious.  And at $2.50 for a package of 8 that is less than
 .32 cents per scone.  It's ok to cheat once in a while.
Not everything has to be made from scratch. 
 Especially when they are as good as these.....YUM!

Tuesday, June 19, 2012

Simplicity

I have found that with all the foodie blogs out there I find myself trying to compete with all the fancy ingredients, impressive techniques, and amazing descriptive stories.  I usually fall flat on my goals.  I don't have a lot of fancy ingredients in my house, I don't use impressive techniques, and sometimes there is no story to go along with the recipe.  With the cost of living these days I have become more creative with my cooking.  I realized today that we have lost the simplicity of cooking with all the new recipes and twists and turns that are now being taken with food on its way to the table.  Tonight's dinner was simple, refreshing, and basic. 
I fed my family of 5 for $10.94 with leftovers. 

1 Whole Chicken - $4.50
1 Tomato, Garlic and Basil Grill Mates Marinade - $0.98
2 lbs Broccoli Crowns - $1.60
1 Small Seedless Watermelon - $2.98
1 Cantaloupe - $0.88

I mixed the marinade according to package directions with 1/4 C. water, 1/4 C. oil (I used Olive Oil) and 2 T. Vinegar (I used white vinegar).  I poured it over a whole chicken.

I covered the chicken with foil, baked at 350* for 1 hour, and then uncovered it and baked for another 20 minutes.  I steamed the broccoli, chopped the fruit and dinner was done!
Here's hoping you get back to some basics in your kitchen!

Monday, June 18, 2012

Biscuits and Gravy

Today was such a hot day.  I suppose that may have something to do with the fact that I dragged my body out to the swimming pool and let the kids swim this afternoon.  My car thermostat said 104*.  This did not sound like the type of weather I wanted to cook dinner in - but to be honest with you after getting a Slurpee and coming into my air conditioned house I caught a second wind.  Also I had already defrosted the sausage so I felt somewhat committed to the plan.  Also I knew that grilling today was out of the question since just the other day after trying to grill, and hooking up 5 different propane tanks to my grill, it was clear that there was no propane at my house and grilling was not going to happen.  So tonight I made biscuits and gravy.  The first thing I did was make my homemade biscuits you may remember this recipe for biscuit bites - with the cinnamon sugar - don't put that on these - just make my basic biscuit recipe and cook them up like you do a regular biscuit.  Once I put the biscuits in the over I made the gravy.  It takes about as long to make the gravy as it does to bake the biscuits so the timing is perfect. 

Take 1 lb sausage and brown with onion, garlic, salt and pepper
Leave the sausage grease in the pan - this will be absorbed by the flour and add the necessary oil to the gravy.  Add about 1/2 C. Flour.
Stir that up - it will kind of pull together in a ball.  Let it cook for about a minute in the pot before adding any liquid.
Add milk to your pot.  This is no exact science...just fill the pot up.
Stir the meat into the milk and bring to a boil.  This will thicken up into a nice sausage gravy.
And you are done!  Most likely those biscuits are ready to be pulled out of the oven and the
biscuits and gravy are ready to serve!
 

Friday, June 15, 2012

Tie Dye Frosting

This is a super fast post.  It's my birthday.  So I made my chocolate cake and used my favortie frosting.....a store bought Butter Cream.  I took the butter cream and divided it into approximate 5ths.  I left one white and with my NEON food coloring I made a green, blue, pink and purple.  I slopped the frosting all over the cake like this:

Then I took an offset spatula and spread it all around
 and this is what I got:
The more you spread the more the colors blend so it is important to not over spread the cake so you can see all the variation in color.  It is not perfect, it is a little sloppy -
 but for my birthday it is just what I wanted.


Wednesday, June 6, 2012

Honey Wheat Bread

I used to make bread all the time.  In fact I never bought bread.  We only ate homemade bread.  I stopped that after my kids got into school and they would come home and ask if they could have store brought bread like their friends.  Oh if only they knew how good they had it back then.  Typically now days if I make bread dough we fry it.  But we will save that for another post.  Today I made some delicious Honey Wheat Bread.  I love this toasted with some butter and jelly. 

Honey Wheat Bread

1 T. Yeast
2 C. White Flour
3 C. Whole Wheat Flour
8 tsp, Vital Wheat Gluten
1 1/2 C. Water
3 T. Butter/Margarine
1 tsp. Salt
1/4 C. Brown Sugar
1/3 C. Honey

Mix yeast, white flour, wheat flour, and  vital wheat gluten into a mixing bowl.
You don't have to use the wheat gluten but if you leave it out be prepared for a heavier more dense loaf of bread.  In a saucepan on the stove top combine water, butter, salt, sugar and honey.  Heat until butter is melted.  Mixture should just be warm.  If your liquid is too hot you will kill your yeast.  I always freeze my wheat flour because I don't go through it as fast as I do white flour - so the cold flour also helps to cool down the liquid.  Combine the dry ingredients with the wet ingredients. Stir with a fork until combined.  You will need to knead it together for a minute or two.
Let dough rise until double and then separate into two equal halves.
Now you can shape it into loaves.  You have some options. 
 One is to make a split top loaf like this.
Very simple - just shape your loaf, place into a greased loaf pan and run a cut down the middle. The second option is my favorite loaf to make.  A braided loaf.  Separate the portion into 3 equal parts and roll 3 ropes about the length of the pan. 
Join the ropes together at the top.
Now braid the 3 ropes and place into your greased loaf pan.
I like to let my loaves rise in a 200* oven
Once double in size turn the heat up and bake at 375* for about 30 minutes.  The loaves will be brown and hollow sounding when you thump them when they are done.  Take them out and rub some butter over the tops of each loaf.
 Wait about 5 minutes and remove from pans on to a cooling rack.  If you can wait let them cool...but since I have no self control I sliced some while it was still hot and let some butter melt into my serving.....yum!


Monday, June 4, 2012

Edible Diorama

Helen was reading a book in class about a man who was stranded on an island and he built a hut and learned to survive.  One of the class assignments was to create a Diorama of the story - and we created an edible diorama.  We made a cake, kind of sculpted it to be different elevations, frosted the cake, put brown sugar on top for sand, used Jello cubes for water, goldfish crackers for fish in the ocean, whoppers for coconuts, and created a Hut and palm trees from clip art and taped them to  some sucker sticks and put the island together. 
Unbelievably Helen only got 2nd place for her Diorama.  We all felt it should have received 1st - but the teacher allowed the class to vote and she got 2nd.  Well...when Cook'n Recipe Organizer was having a contest for "most creative dessert" I entered Helen's Diorama in the contest and - While it took 2nd place ... again ... I won this neat prize -
The Cook'n Recipe Organizer for my computer. With this I will be able to find recipes using their search engine, capture the recipe for my collection or add my own recipes.  I can type in the ingredients I have on hand for recipe suggestions.  I can sync recipes with an IPhone, IPad and Android system, Email recipes, print a family cookbook, Change the recipe quantity for cooking with a large group or just a few, make and create custom meals and menu plans, create shopping lists, and analyze nutritional values.  It also came with a free e-book cookbook of my choice.  I am so excited to learn how to use this system.  Also I love creating cook books so I am excited for that feature! In addition to the computer pack I received This binder....
It stands up on it's own for recipes.  And I received all these inserts for the binder...
Page protectors that will hold up to 6 recipe cards per page - enough for 120 recipes.  Printable recipe cards to print on my computer just the right size to fit in the page protector slots - enough for 240 recipes, and notebook dividers for the following categories:  Appetizers & Beverages, Breads & Breakfasts, Soups & Stews, Salads & Sides, Beef & Pork, Poultry & Fish, Other Main Dishes, Desserts, Preserves & Canning, and Other.  Anyone who knows me knows that I love a good contest - and this was a good one!  I am so excited to start using my fun new prize. On a "food" note, maybe the next time your child needs to make a diorama for school you can think outside of the box
and try an edible diorama!